Preface
Over my last several years as a product engineer, I've navigated roles across several software products, ranging from full-stack to purely mobile/front-end. I have used tools ranging from Vercel to AWS, Supabase to Firebase, and EKS/Terraform to pure serverless. Developer communities often joke about the complexity of the frontend ecosystem (specifically JavaScript). The irony is that today backend complexity can easily surpass the frontend, but it seldom does out of necessity.
In this article, we will explore the current state of could development by examining the differences between infrastructure as code (IaC) and infrastructure from code (IfC). Then we will look at a new offering amongst IfC frameworks called Nitric, examine its high-level benefits, and build & deploy a simple API to better understand the framework.
Infrastructure as code
Traditionally, cloud applications are composed separately from how they are deployed. And often in different languages. The most popular form of infrastructure automation is a tool called Terraform.
Using HashiCorp Configuration Language (HCL) engineers can provision and manage resources in a way that is declarative, reusable, and cloud-agnostic. Terraform and its competitors birthed the term Infrastructure as Code (IaC).
While a clear improvement upon provisioning and managing resources manually or using cloud-specific scripts, IaC has its downsides. IaC still requires developers to understand the complexities of constantly evolving cloud infrastructure providers. Compare the level of effort deploying an API or application with Vercel or Netlify instead of with AWS with Terraform. The former platforms implicitly provision infrastructure derived from the framework and application code. On the other hand, an AWS/Terraform configuration defines an explicit declarative state for the infrastructure. Unless they are lucky enough to work in a company with dedicated DevOps, developers using IaC need to write both application logic and control plane-specific instructions, exponentially increasing their job responsibilities. At times, businesses have complex problems that cannot be solved with the simplicity of a Vercel application, so while it would be nice to say "Just use these platforms" it is also unrealistic for every scenario.
Infrastructure from code
Infrastructure from Code is an evolution of IaC that lets product engineers leverage their existing programming skills, allowing them to focus on writing business logic instead of learning and configuring constantly evolving cloud services.
Simply put IfC offers the simplicity of fully managed platforms like Vercel, with the flexibility of do-it-yourself platforms like AWS. Cloud applications commonly need to expose an API or application, access private information, handle recurring & asynchronous tasks, store & retrieve files, and manage real-time communications. IfC frameworks infer requirements from application logic and provision the environment accordingly. This benefit allows product engineers to focus on writing business logic.
Now that we understand the differences between IaC and IfC, let's delve into one popular IfC framework called Nitric.
What is Nitric?
Taken from its website, Nitric is a cloud-aware application framework. This definition is analogous to IfC.
Nitric helps developers build and deploy cloud applications faster and easier by providing a unified framework for managing code and infrastructure across different cloud platforms. Nitric offers the following primitives:
API - define API endpoints, each with its routes, middleware, handlers, and security.
HTTP - connect Nitric to existing frameworks.
Key-Value - simple persistent key/value stores.
Schedules - regularly scheduled jobs.
Storage - securely read, write, and serve files programmatically.
Messages - event-driven workflows to handle async tasks using topics or queues.
Secrets - secure storage, updating, and retrieval of sensitive information like passwords.
Websockets - manage real-time communications between the app and client browsers.
These primitives are converted to cloud resources at deployment time. Nitric bets that these primitives solve most of the problems that product engineers face.
Before we get too involved with Nitric, let's explore some of the benefits that differentiate it from similar IfC frameworks.
Why Nitric?
There are several popular IfC options, but the features that differentiate Nitric are multi-language support, flexibility, and local simulation.
Multi-language support
Nitric allows you to develop cloud applications using various languages like Python, C#, Java, JavaScript/TypeScript, Go, and Dart. By providing popular languages with a consistent API, the technology you are comfortable with becomes an implementation detail. Most IfC providers offer one or two languages, but none approach what Nitric provides, and if Nitric succeeds on a large scale that will democratize developers, allowing them to float between companies with different backends and not lose a step.
Flexibility
Nitric is built on Pulumi and is likely interoperable with your current IaC setup. As OSS, Nitric can be tailored to specific needs with custom providers and custom runtimes. Many of the success stories of the Nitric team focus on their efforts to help adopters migrate to Nitric or integrate it into their current systems.
Local simulation
Nitric provides a fully emulated environment that allows developers to debug and test their applications locally before deployment. Normally when developers interface with cloud providers, their local setup differs dramatically from their cloud setup, but with Nitric that is not the case. A developer can run the same tests locally or on the cloud without mocks.
Now that we've briefly reviewed Nitric and its benefits, let's build a simple API.
Building a simple Hello World API
Let's get to know Nitric further by building a simple API with two endpoints:
hello/:namewill return a greeting to the name parameter.goodbye/:namewill return a farewell to the name parameter.
Prerequisites
Installed and configured Pulumi: https://www.pulumi.com/docs/install
Installed and configured cloud provider CLI: https://nitric.io/docs/reference/providers/aws#usage
Setting up Nitric
To start, install Nitric by running the following command in our terminal:
brew install nitrictech/tap/nitric
For this example, we will use the new experimental Dart API, so create a Dart application with the following terminal command.
dart create -t console hello_nitric
Next, open the project folder's root in your favorite text editor, and add Nitric as a dependency. When we are finished, our pubspec.yaml file should resemble the following:
name: hello_nitric
version: 1.0.0
environment:
  sdk: ^3.3.3
dependencies:
  nitric_sdk: ^1.1.0
dev_dependencies:
  lints: ^3.0.0
  test: ^1.24.0
Finally, let's add a configuration file that will register our project with the Nitric CLI. Create a file named nitric.yaml and add the following code.
name: hello_nitric
services:
  - match: bin/hello_nitric.dart
    start: dart run $SERVICE_PATH
The previous code registers the project's name and identifies the services we will create and how to run them.
Next, let's look at how to create an API.
Creating the API
Now that we have the basic setup for our Nitric project, let's add some endpoints. First, delete the lib and test folders. You'll have to get your DDD/Clean Architecture knowledge elsewhere because today we are working directly with bin/hello_nitric.dart. Replace the contents of that file with the following code:
import 'package:nitric_sdk/nitric.dart';

void main(List<String> arguments) {
  final helloApi = Nitric.api("hello-world");

  helloApi.get("/hello/:name", (ctx) async {
    final name = ctx.req.pathParams["name"]!;
    ctx.resp.body = 'Hello $name';

    return ctx;
  });

  helloApi.get("/goodbye/:name", (ctx) async {
    final name = ctx.req.pathParams["name"]!;
    ctx.resp.body = 'Goodbye $name';

    return ctx;
  });
}
In the previous code, we do the following:
Import the Nitric SDK
Define a single API with the name
hello-worldDefine an API endpoint
hellothat takes anameparameter and returns the name prefixed withHello.Define an API endpoint
goodbyethat takes anameparameter and returns the name prefixed withGoodbye.
Next, we will run the application using the Nitric CLI. In the project root, run the following command from the terminal:
nitric start
The start command will set up Nitric's local server and run our project for development. A browser should open displaying the Nitric development dashboard.

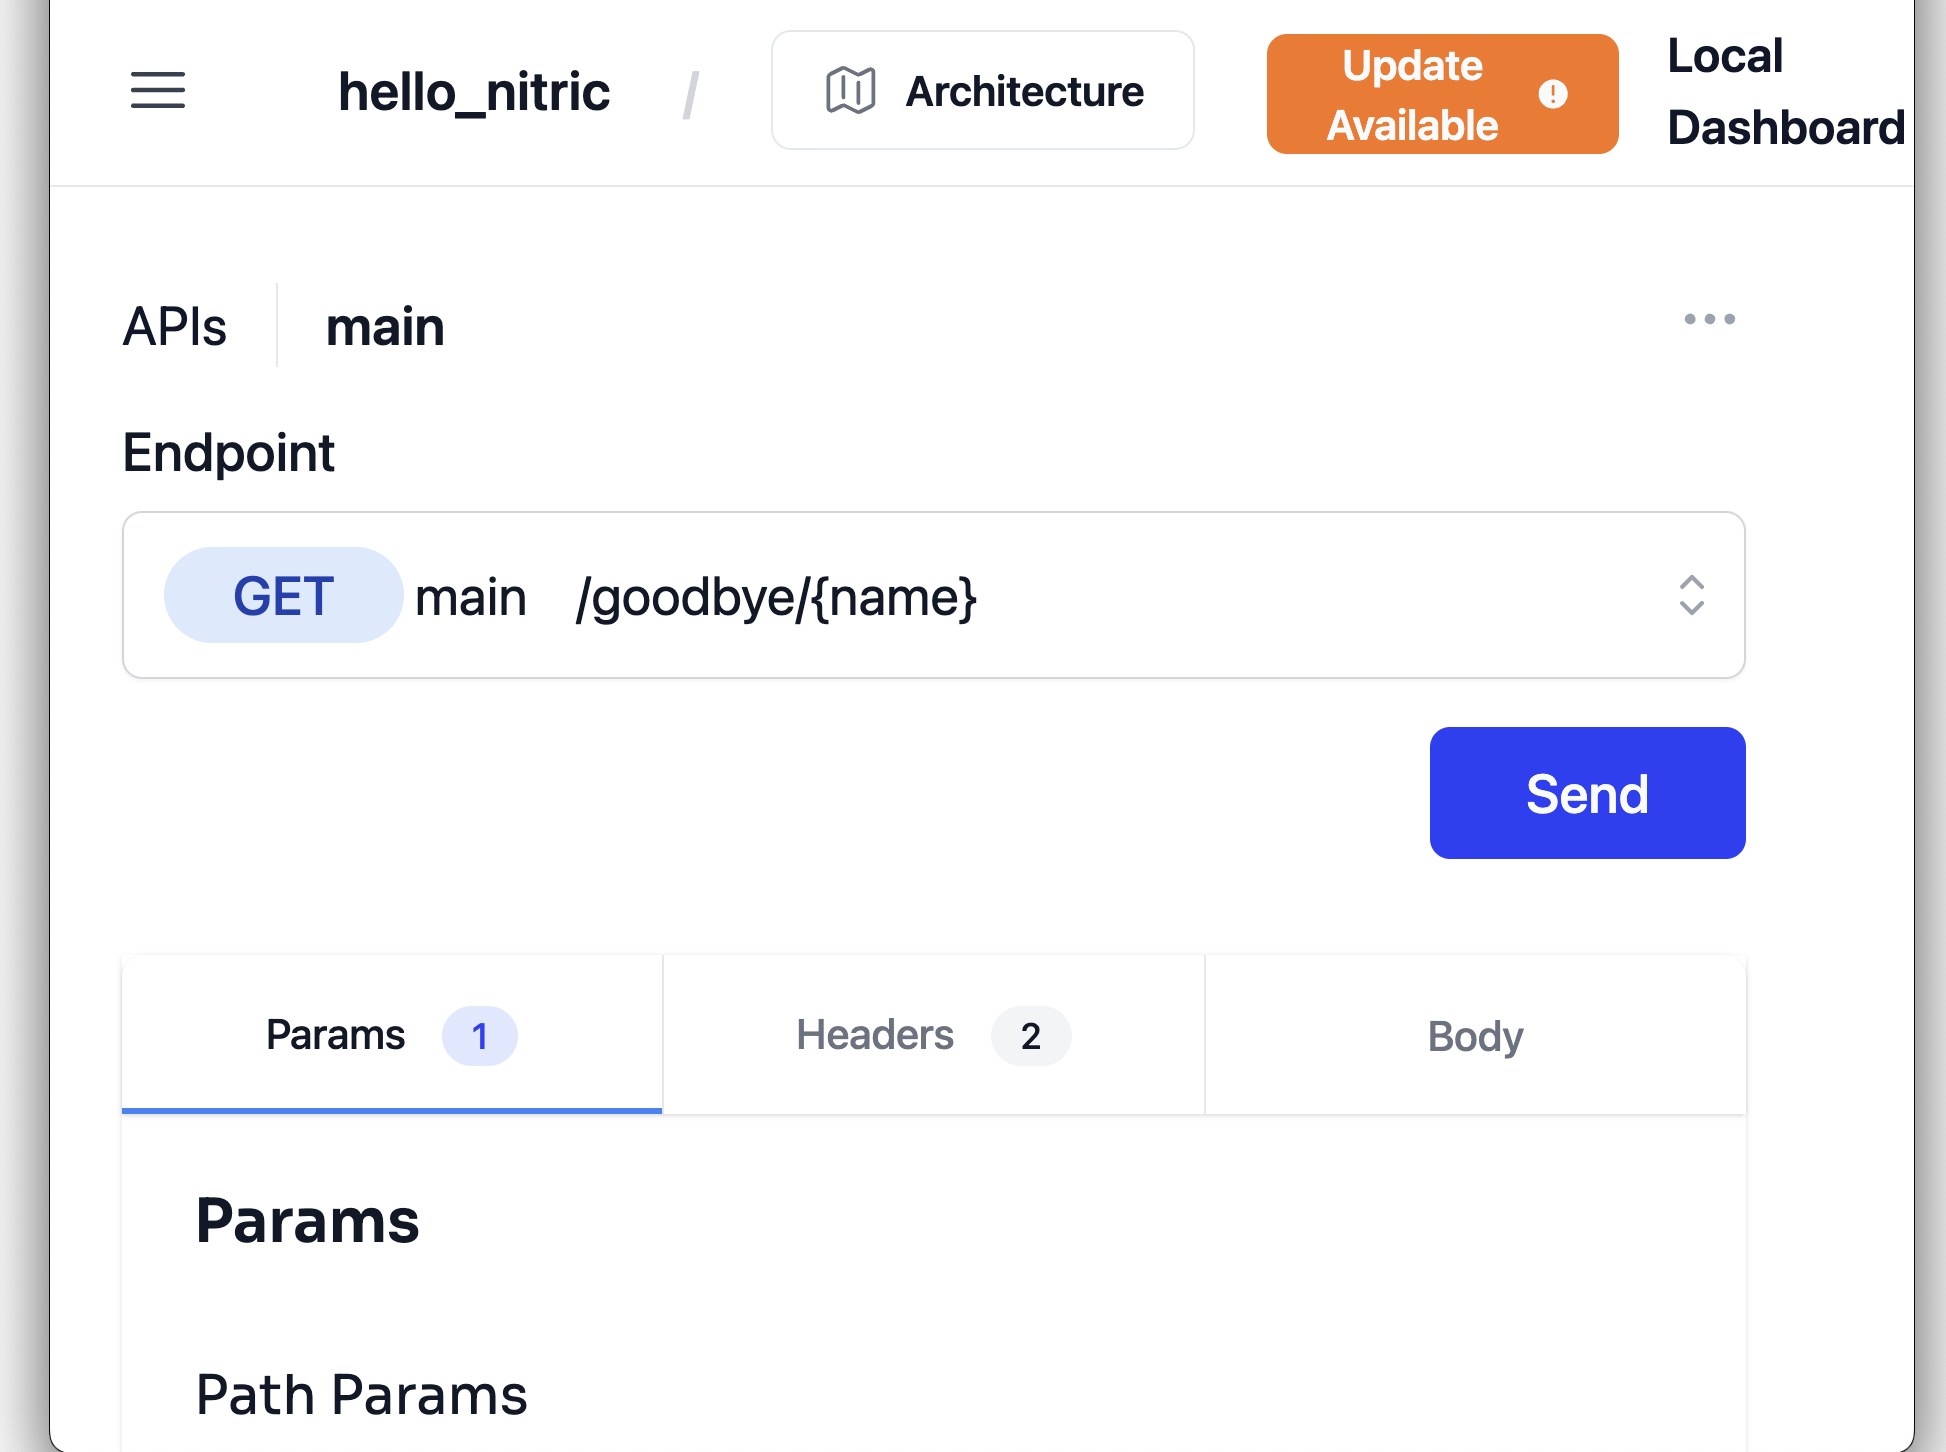
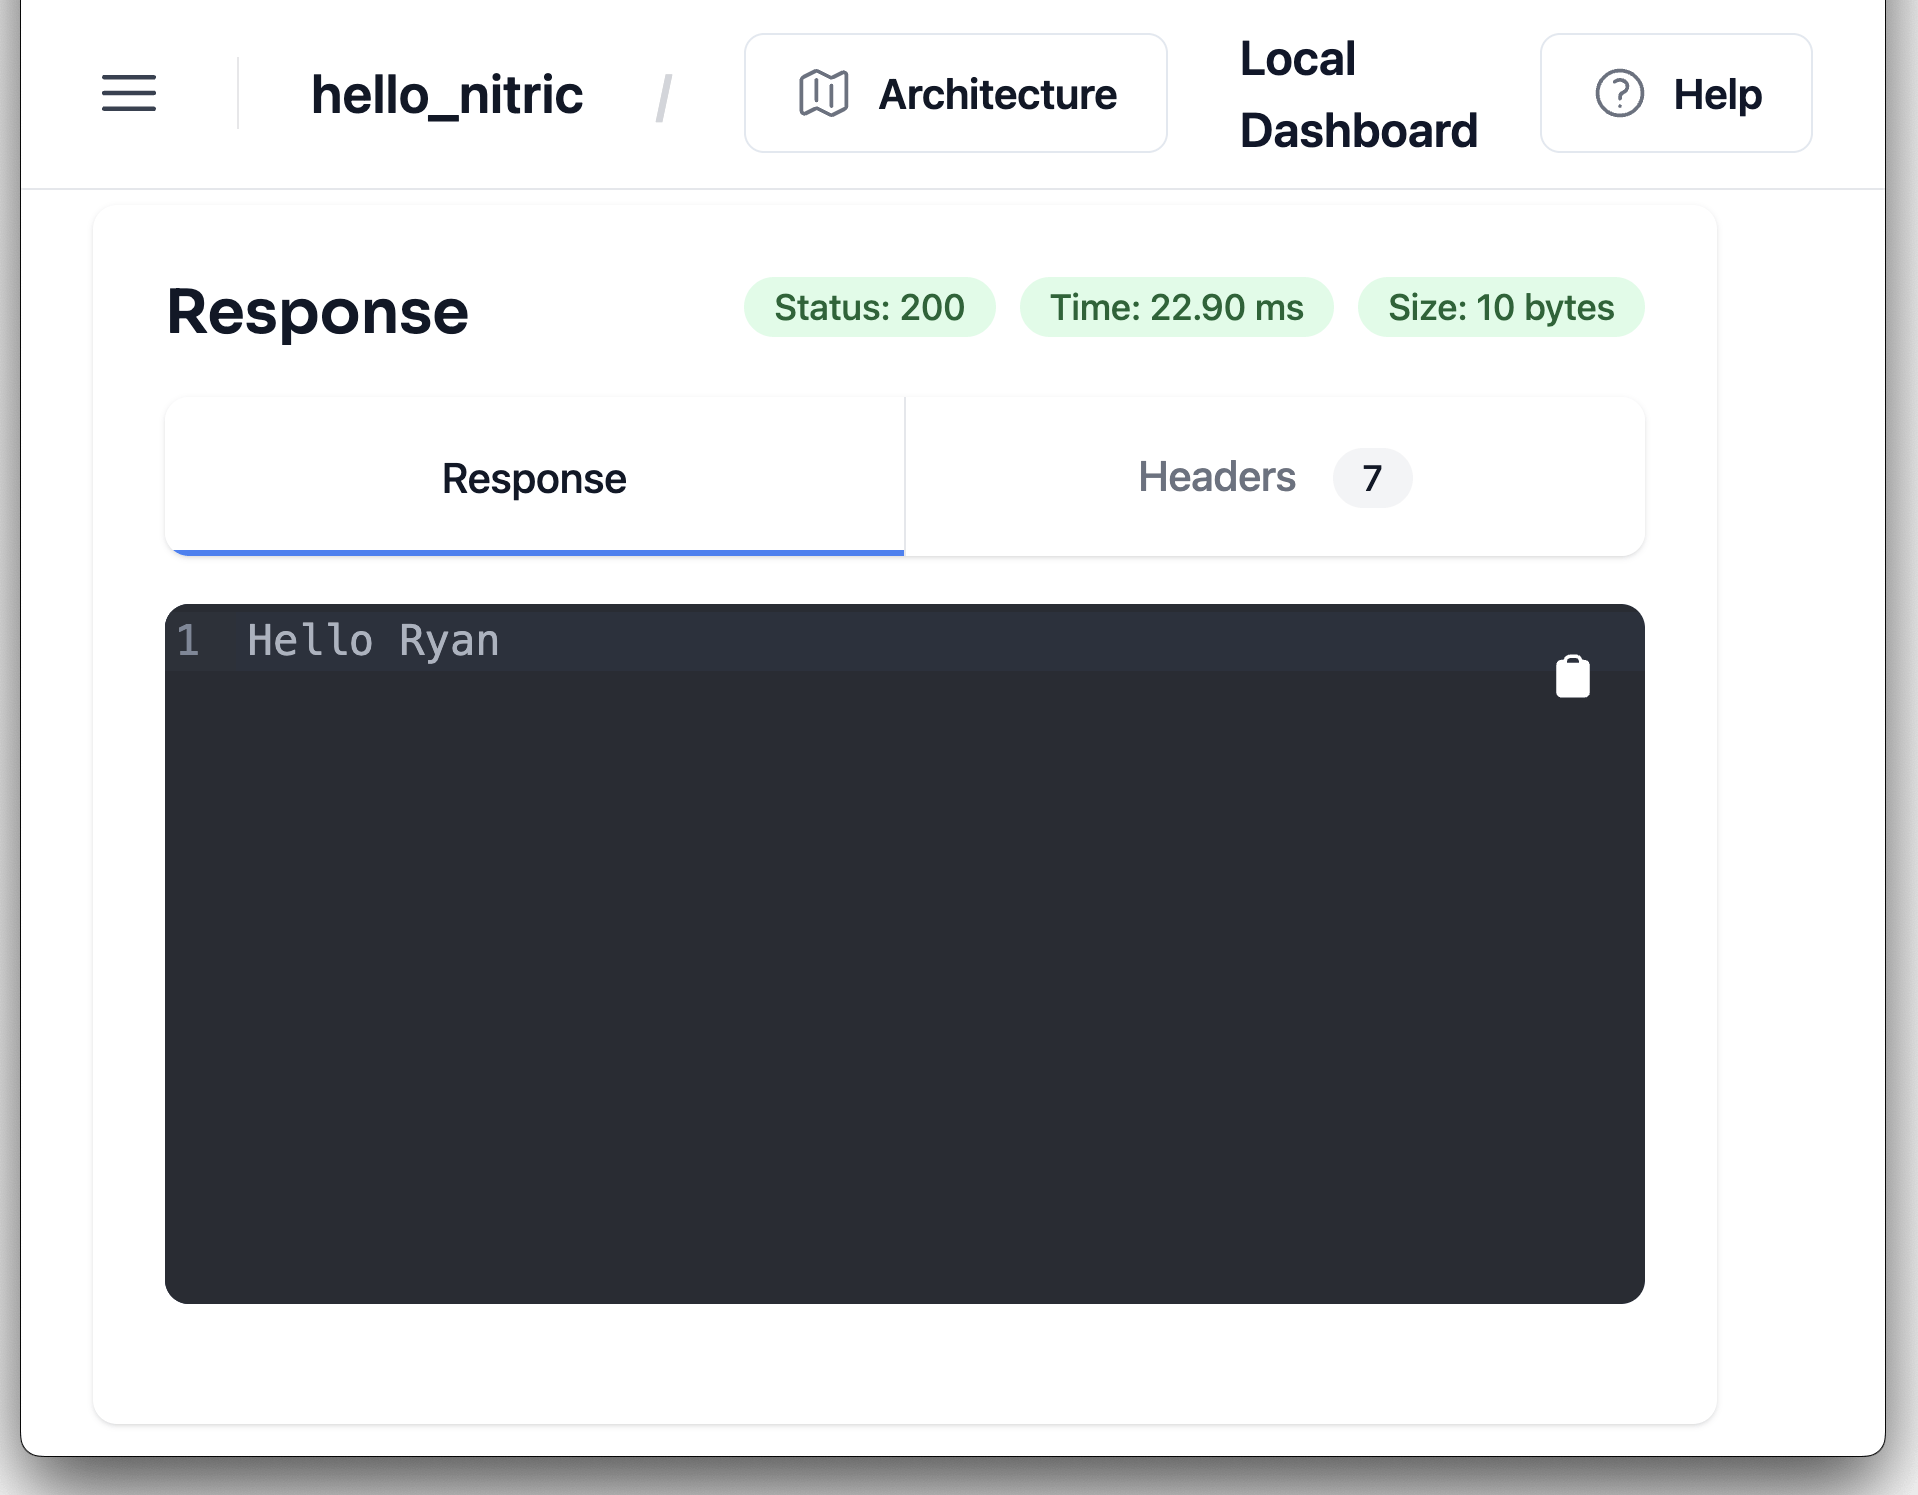
From this dashboard closely resembling Postman, we can test the endpoints we built to ensure they work correctly before deployment. Notice that our path parameters are predefined. If you add a value and select the send button, you should see a response that resembles the following screenshot:

In this screenshot, notice that we have tested our hello endpoint by adding the value Ryan to the name parameter. The local dashboard helps developers easily test APIs, storage, schedules, topics, or websockets they create.
Additionally, Nitric allows us to inspect how our resources interact with the architecture tab. In our case, we should see a fairly simple graph resembling the following image:

This graphic shows that we have defined one API resource in bin/hello_nitric.dart. For developers new to Nitric or onboarding to an existing project, this interactive graph allows them to trace resources and dependencies to code, and better understand the project's architecture.
Next, let's look at how to deploy our API to a cloud provider using the Nitric CLI and Pulumi.
Deploying our API
Now that we are done building the API, let's deploy it to the cloud. First, we'll ensure that our credentials are configured correctly for Pulumi and the cloud provider. In this example, we will deploy to AWS.
Once our credentials are set up, create a new stack for the application by running the following command in the terminal:
nitric stack new dev aws
The stack new command will create a configuration named dev - for the cloud development environment - that targets the AWS provider.
The resulting nitric.dev.yaml file should resemble the following:
provider: nitric/aws@1.2.0
region:
This file allows us to configure cloud-provider-specific instructions, such as the deployment region, lambda configurations, or custom domains. Developers can create as many combinations of stacks with providers, so we could even test providers to see how they scale to user traffic and load.
Now that our stack is configured, it is time to deploy. In the terminal, execute the following command.
nitric up dev
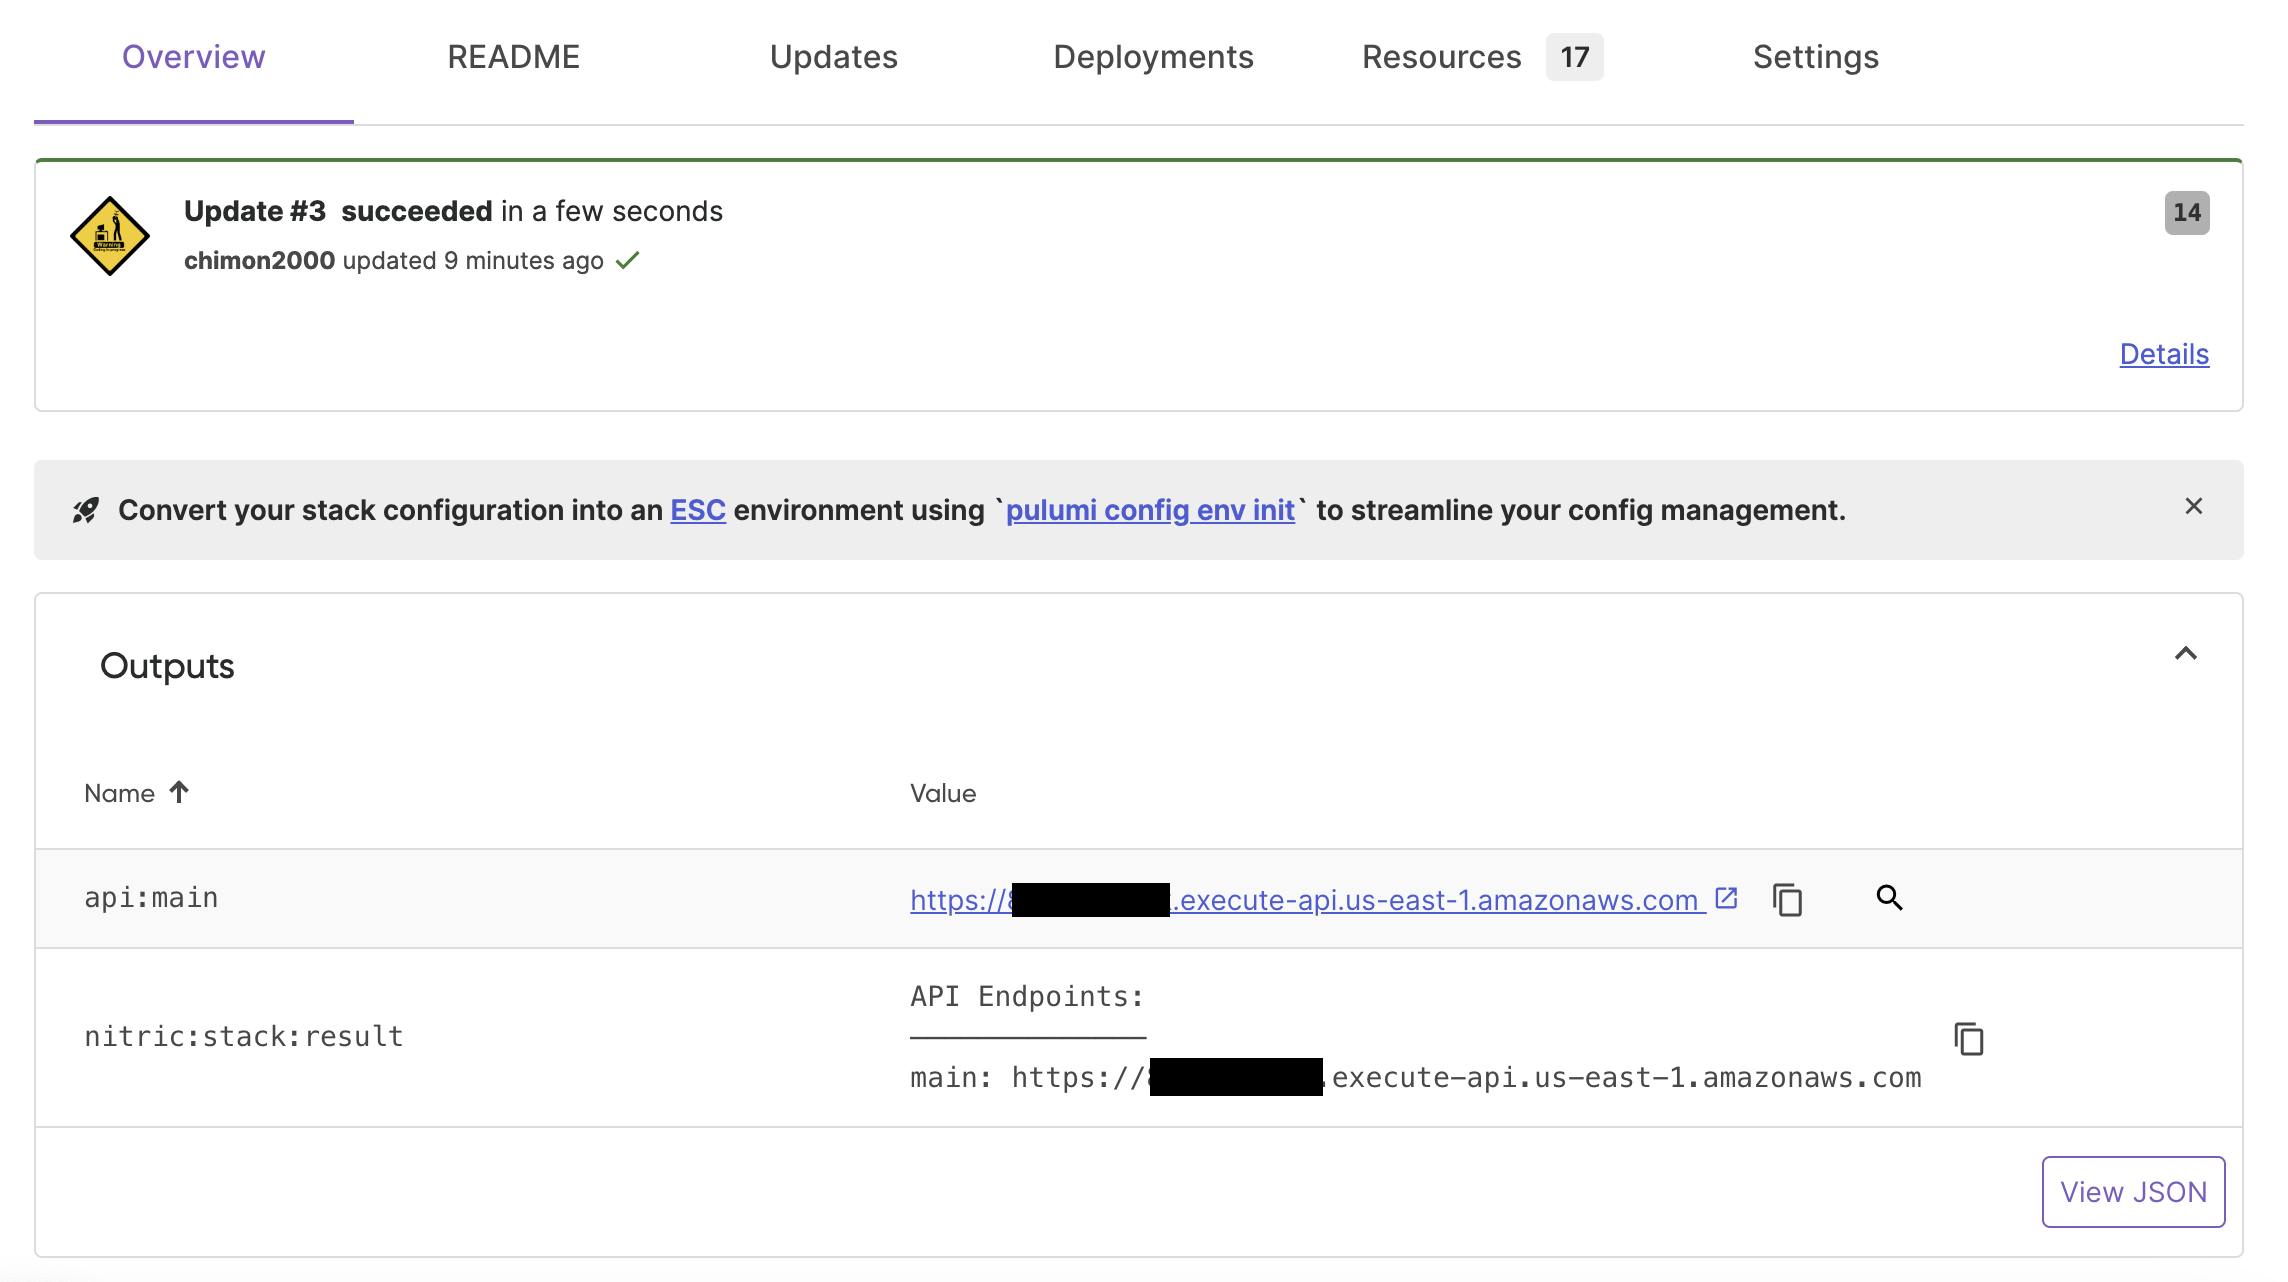
This command will deploy our resources to AWS, outputting any resulting APIs to the terminal. In our case, we should have one API that we can use to interact with our hello and goodbye endpoints. By accessing the Pulumi Cloud dashboard, we inspect the stack. The overview tab, should resemble the following graphic:

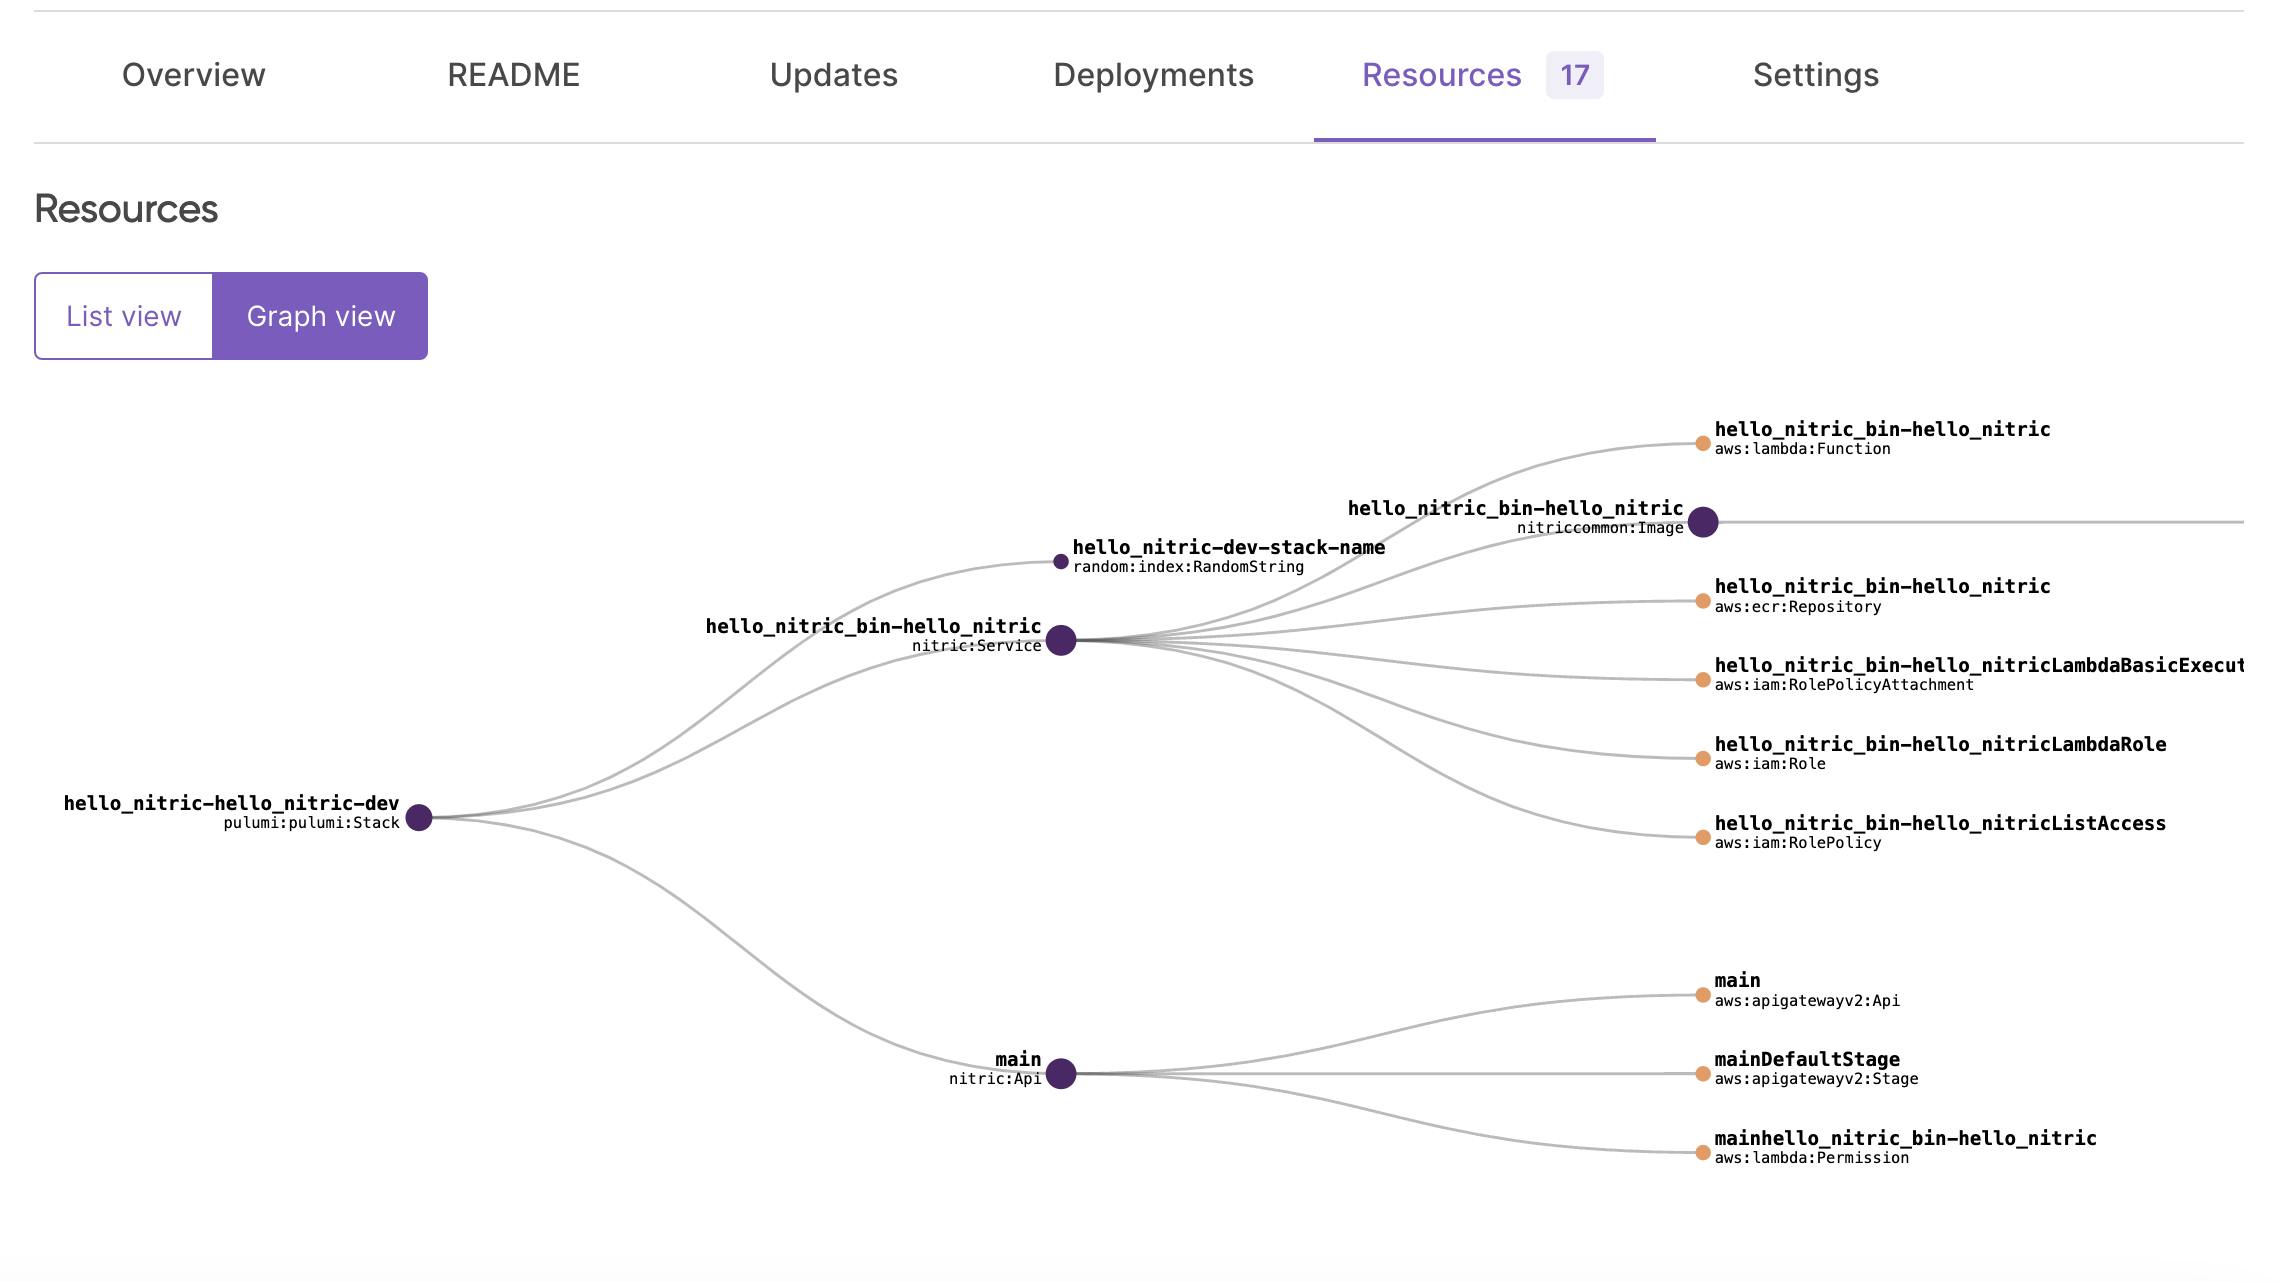
The outputs should resemble what is displayed in the terminal as the result of running the nitric up dev command. Taking the inspection further, we can view a graph of our deployed resources to understand how Nitric primitives map to cloud provider resources. The resources tab should look like the following image:

This more detailed architecture graph shows us the exact mappings to AWS resources we can explore in the AWS console. This extra layer of detail will be critical when debugging and navigating the AWS console, which can be quite a task.
Now that we have explored how to build a simple API with Nitric, let's review.
Wrapping up
Today we learned about the differences between IaC and IfC, and how the latter enables product teams to be more productive with their time. We also explored the benefits of one up-and-coming IfC framework called Nitric, which offers standout flexibility, multi-language support, and developer tooling. Finally, we built a simple API with Nitric and deployed it to AWS.
Hopefully, this article has empowered you as a product engineer with more options and tools that will help you focus on building products.
In future articles, we'll explore more of Nitric's resources, how to extend the framework, and how to connect to client applications.

